
As an aspiring system administrator, home server enthusiast, or IT newcomer, you face the exciting task of setting up a powerful virtualization environment. Proxmox Virtual Environment (Proxmox VE) is an excellent choice that offers professional features without licensing costs. In this guide, we walk you step by step through the installation and creation of your first virtual machine.
Proxmox VE is an open-source platform based on Debian Linux that works with the virtualization technology KVM (Kernel-based Virtual Machine). It allows you to create and efficiently manage powerful virtual machines – ideal for homelabs, small server setups, or getting started in the world of virtualization.
┌─────────────────────────────────────────────────────────────┐
│                 PROXMOX VE SYSTEM ARCHITECTURE              │
├─────────────────────────────────────────────────────────────┤
│                                                             │
│   Web Browser ──► HTTPS :8006 ──► [ Proxmox Web GUI ]       │
│                                           │                 │
│                 ┌─────────────────────────┴────────┐        │
│                 ▼                                  ▼        │
│    ┌────────────────────┐        ┌─────────────────────┐    │
│    │  KVM / QEMU VMs    │        │    LXC Containers   │    │
│    │  (Windows / Linux) │        │    (Linux guests)   │    │
│    └─────────┬──────────┘        └──────────┬──────────┘    │
│                 │                                  │        │
│                 └─────────────────────────┬────────┘        │
│                                           ▼                 │
│                   [ Debian Linux Kernel & PVE Core ]        │
│                   CPU, Memory & Bridge Networking           │
│                                           │                 │
│                                           ▼                 │
│                   [ Storage: ZFS / LVM-Thin / NFS ]         │
│                                                             │
└─────────────────────────────────────────────────────────────┘
This guide gives you the knowledge and tools to successfully install Proxmox VE on your server and start right away with your first VM. More complex topics such as containers, firewalls, backups, or monitoring are reserved for follow-up articles – this guide focuses on the fundamentals so you get a straightforward and stress-free start.
Preparation
Before we can install Proxmox VE, it is important to make all necessary preparations. In this section, we take care of the basic prerequisites so that the installation runs smoothly. We check the hardware, download the Proxmox ISO image, and prepare a bootable USB stick.
Check Hardware Requirements
Proxmox VE is flexible, but requires certain prerequisites to run optimally.
💡 Minimum Requirements:
- Processor: 64-bit CPU with Intel VT-x or AMD-V support
- RAM: Minimum 2 GB (recommended: 8 GB or more for production environments)
- Hard Drive: Minimum 32 GB of available storage (SSD recommended)
- Network: Minimum one wired network card
How to check if your processor supports virtualization:
# Check if VT-x or AMD-V is enabled in the processor
egrep -o '(vmx|svm)' /proc/cpuinfo
# What does the command do?
# * Searches for the virtualization flags "vmx" (Intel) or "svm" (AMD)
# * Produces no output if virtualization is not supported

# Typical output:
vmx
What does the command do?
- Searches for the virtualization flags
vmx(Intel) orsvm(AMD) - Produces no output if virtualization is not supported
💡 Pro Tip: If you are unsure, you can also visit the official page of your processor (e.g. Intel ARK or AMD specifications) to check the virtualization capabilities.
Download Proxmox ISO Image
To install Proxmox, we need the installation ISO. You can get it free of charge from the official Proxmox website.
Step 1: Visit the Official Website
Go to the Proxmox download page and download the latest version of Proxmox Virtual Environment (VE).
ISO Download:
- URL: proxmox.com/en/downloads
- Select: Proxmox VE ISO Installer
- Save the file in an easily accessible folder
Typical File Size: ~1 GB. Make sure you have a stable internet connection.
Step 2: Verify Integrity
After the download, you can verify the integrity of the ISO file to make sure it was not corrupted.
# Check the SHA256 hash
sha256sum proxmox-ve_*_iso.iso
# Compare the output hash with the value on the Proxmox website
💡 Why is this important?: An ISO file that was corrupted during download could lead to installation problems.
Create a Bootable USB Stick
A Proxmox installation is typically done from a USB stick. Here we show you how to create a bootable USB stick using Linux.
On Linux:
You can use the command-line tool dd to create the USB stick.
⚠️ Warning: This process overwrites all data on the USB stick. Make sure you have backed up important data.
Find USB Device:
lsblk

# Typical output:
# sda   8:0    0 32G  0 disk
# └─sda1
# The USB stick is "sda" in this example
Create Bootable USB Stick:
sudo dd if=proxmox-ve_*_iso.iso of=/dev/sdX bs=4M status=progress
⚠️ What does the command do?
- if: Input file (the Proxmox ISO)
- of: Target file (your USB stick, e.g.
/dev/sda) - bs=4M: Optimizes write speed
- status=progress: Shows progress
Safely Remove USB Stick:
sudo sync && sudo eject /dev/sdX
Test the USB Stick:
Before you start the installation, make sure the USB stick was created correctly:
- Connect the USB stick to a test PC and boot from it.
- If the Proxmox installation screen appears, the stick is ready for use.
USB Test:
- Connect stick
- Open boot menu (usually
[F12],[F11], or[Esc]) - Proxmox boot screen appears
⚠️ Preparation Checklist:
- Hardware supports virtualization (VT-x/AMD-V)
- Proxmox ISO successfully downloaded
- ISO integrity (SHA256) verified
- Bootable USB stick created and tested
Installation
Now that you have completed the preparations, we can begin installing Proxmox VE. In this section, we guide you step by step through the installation process – from BIOS settings to configuring the basic system parameters.
Adjust BIOS Settings
Before you install Proxmox, you should make sure that the BIOS settings of your PC/server are configured correctly.
The following parameters are important for virtualization:
1. Enable Virtualization:
- Look for an option like
Intel VT-xorAMD-Vand make sure it is enabled. - You can usually find this under
Advanced SettingsorCPU Configuration.
BIOS Menu:
- Advanced Settings
- CPU Configuration
- Intel VT-x [Enabled]
- Save & Exit
2. Set Boot Order:
- Set the USB stick with the Proxmox installer to the first position in the boot order.
- You can usually find this option under
Boot Settings.
Boot Order:
- Proxmox Installer
- HDD/SSD
- Save & Exit
Save and Restart:
After you have made the settings, save them (usually via F10 or Esc with selection of Save Changes) and restart the PC.
Install Proxmox
Once your PC boots from the USB stick, the Proxmox installer appears. Follow these steps to install Proxmox:
Step 1: Welcome Screen
After starting the installer, you will see the Proxmox welcome screen.
Select the option:
Proxmox Installer:
- Install Proxmox (VE) (Graphical)
- Install Proxmox (VE) (Terminal UI)
- Advanced Options
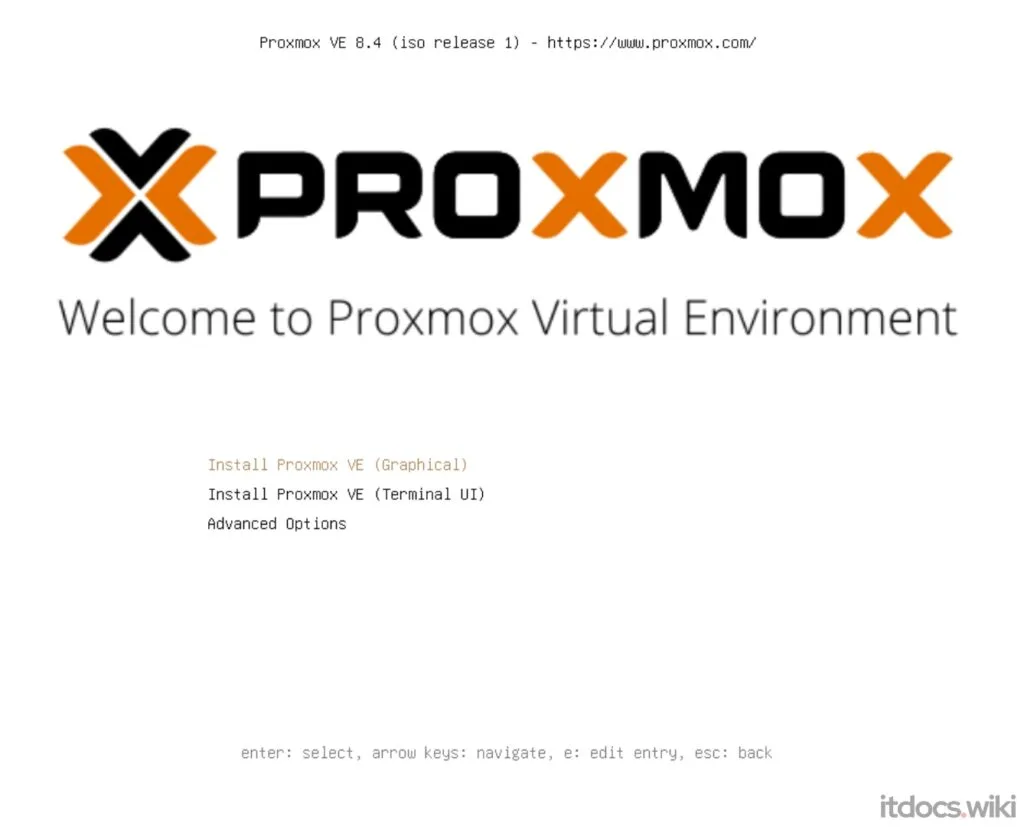 Press
Press Enter to start the installation.
Step 2: Accept License Agreement
Read the license agreement and confirm by clicking "I Agree".
Step 3: Select Hard Drive
Select the hard drive where Proxmox should be installed. If you have multiple hard drives, make sure you select the correct one.
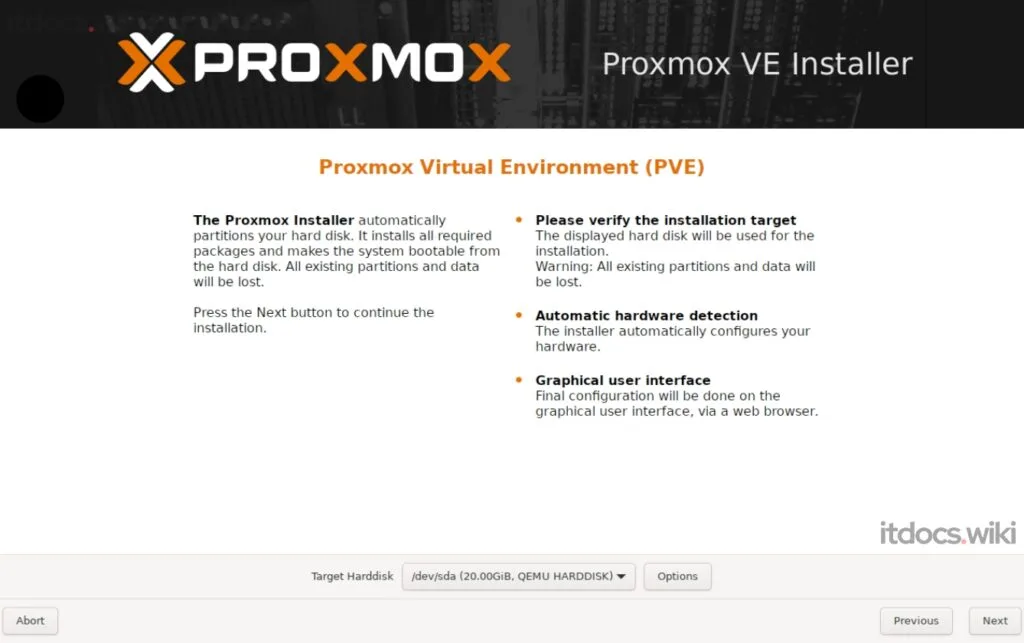
⚠️ Partition Scheme: The installer automatically selects the optimal scheme. However, you can change this manually if you have special requirements. To do so, click on Options.
Step 4: Select Location and Timezone
In the next step, you will be asked to select your geographic location and timezone. These settings are important for configuring Proxmox correctly, especially for scheduled tasks such as backups and updates.
Timezone Selection:
- Location: Berlin, Germany
- Timezone: Europe/Berlin
- Language: German (optional)
Select your location from the list and make sure the timezone is set correctly. You can also change the language of the user interface if desired.
Step 5: Administrator Password and Email Address
In the next step, you will be asked to set a password for the root account. Choose a strong password, as this account has full administrator privileges. Also enter a valid email address. This is used to send notifications (e.g. about updates, backups, or alerts).
# Generate password recommendation
openssl rand -base64 16
# Typical output:
f8JXql9+La65PKY3tv9w==
Step 6: Configure Management Network
Now the management network is configured. This is the network connection through which you will later access the Proxmox web interface.
Configure Network Parameters:
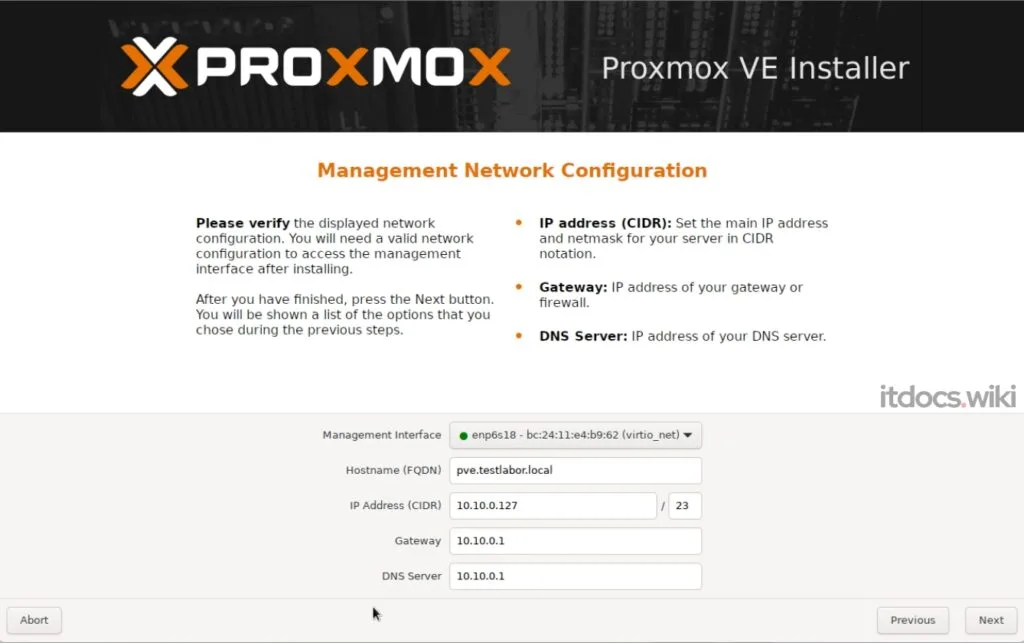
Network Configuration:
- Hostname: pve.testlabor.local
- IP Address: 192.168.1.100
- Subnet Mask: 255.255.255.0
- Gateway: 192.168.1.1
- DNS Server: 8.8.8.8, 1.1.1.1
If your network uses DHCP, you can let these settings be obtained automatically from the router. However, a static IP is recommended for servers.
Step 7: Review Summary
The installer now displays a summary of the settings made. Review carefully that everything is correct. If something is wrong, you can go back to the respective steps and adjust them.
Step 8: Start Installation
After you confirm the summary, the installation begins. This usually takes only a few minutes. You will see a progress bar while Proxmox is being written to the hard drive.
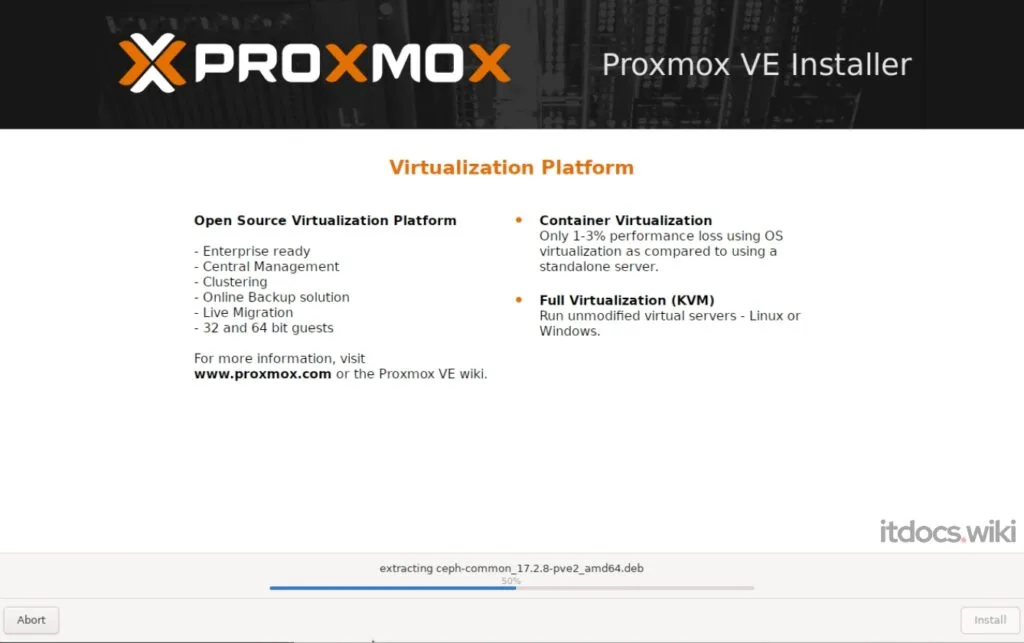
Step 9: Installation Complete
After the installation, you will receive a message that the installation was completed successfully. Remove the USB stick and restart the system.
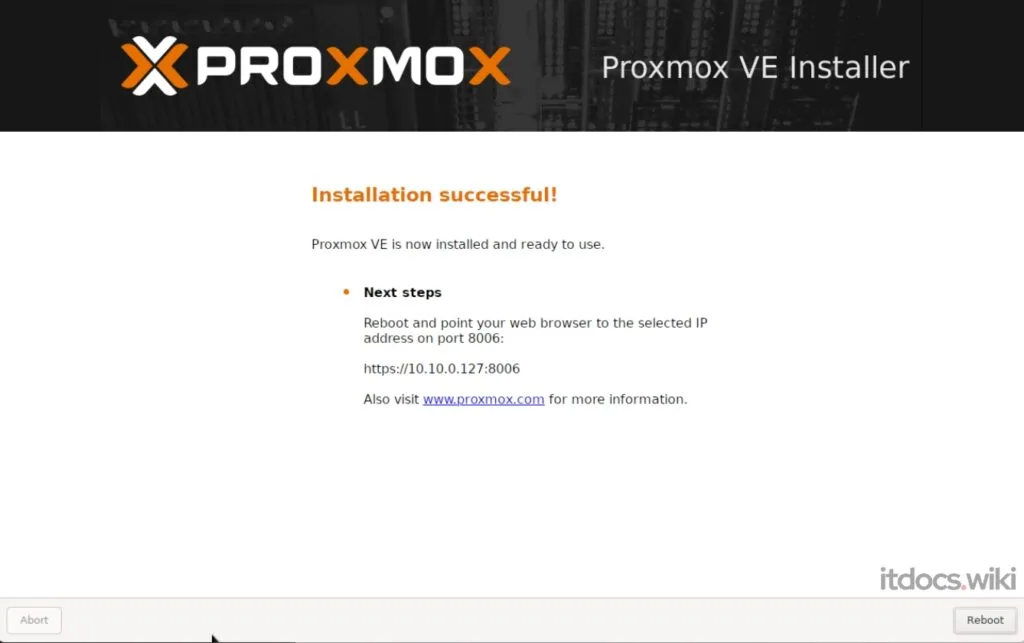
Access the Web Interface
After the restart, you can configure Proxmox VE via the web interface. Enter the IP address you set during the installation, followed by :8006, to access the management interface.
Example:
Web Interface:
https://192.168.1.100:8006
When you access it for the first time, a security warning is displayed because Proxmox uses a self-signed certificate. Proceed to open the page.
Log in with the user root and the previously set password.
⚠️ Installation Checklist:
- BIOS settings checked and adjusted
- Proxmox successfully installed
- Management network configured
- Web interface accessible
Basic Configuration
After the successful installation of Proxmox VE, it is time to configure your freshly installed system. In this section, we take care of the most important basic functions: system updates and storage configuration.
Perform System Updates
Updating your Proxmox system is an important step to close security vulnerabilities and get the latest features. With Proxmox, you can do this entirely via the web interface – no terminal required. Here are the exact steps for configuring the repository settings and applying updates.
Step 1: Check Update Repositories
Navigate to Datacenter > Node (the name of your Proxmox server). Click on Updates, and then on Repositories. Here you will see the list of currently configured software sources (repositories).
Disable Enterprise Repository:
- Click on the
Enterprise Repositoryto select it. - In the next window, you will find the option
Disable. - Click on it to disable the Enterprise repository.
Repository Settings:
- Enterprise: DISABLED
- Community: not yet added
Add Community Repository:
- Stay in the
Repositorieswindow and click onAddin the top right. - A small window opens where you can select the repository.
- Select
No Subscriptionhere. - Click on
Addto add the Community repository.
Add a new repository:
- Repository Type:
No Subscription - Status:
ADDED
The repository status should now look like this:
Repository List:
- Enterprise:
DISABLED - No Subscription:
ENABLED
Step 2: Apply Updates
After the repository settings have been adjusted accordingly, you can apply the updates.
Go back to the Updates view by clicking on Datacenter > Node > Updates in the top left.
- Click on
Refreshhere to load the latest available updates from the Community repository. - After updating the package list, you will see an overview of the available updates.
Example Updates Available:
- Kernel Update:
pve-kernel-5.15.116-1-pve - Proxmox VE Tools:
pve-manager 8.0-12 - System Tools:
libpve 7.4-3
Click on Upgrade to download and install the updates.
The update process is started. It takes a few minutes depending on the number and size of the updates. You will be informed about the progress.
Restart After Kernel Updates:
If a kernel update was installed during the upgrade, you will be notified that a restart is required. Click on Reboot to restart the system and activate the changes.
⚠️ Summary of Steps:
- Repositories:
Enterprise: DISABLED,No Subscription: ENABLED - Updates: Package list updated, updates installed
- Restart: Performed after kernel updates
Virtual Machines
Virtual machines (VMs) are a central component of Proxmox VE and allow you to run various operating systems on your virtualization platform. In this section, we show you step by step how to create a VM, install an operating system, and optimize the VM.
Add ISO File
Before you can create a VM, you need to provide an operating system ISO image on your Proxmox server. There are two options: uploading from the local hard drive or downloading directly via a URL.
Log in to the web interface by opening https://<proxmox-ip>:8006 and logging in with your root user.
Select Local Hard Drive/Storage:
- Go to the left side and click on the entry
local (lvm)under your node. - Select
ISO Imagesin the right area.
Storage Selection:
- Select local (lvm)
- Open ISO Images
Upload ISO:
- Click on
Upload. - Select the ISO file on your local hard drive (e.g.
ubuntu-22.04-server.iso). - Click on
Uploadto upload it to the server.
Upload ISO:
- Local File:
ubuntu-22.04-server.iso - Size: ~1.5 GB
- Status: Uploading...
Download ISO:
- Alternatively, you can use a URL directly. Click on
Download from URL. - Enter the URL to the ISO file (e.g.
https://releases.ubuntu.com/22.04/ubuntu-22.04-live-server-amd64.iso). - Click on
Downloadto download the ISO directly to the server.
After the upload or download is complete, the ISO file will be displayed under ISO Images in the storage.
Create VM
Click on the blue Create VM button in the top right or right-click on your node and select Create VM.
Step 1: General
In the first tab General, you set the general properties of the VM.
- The
Nodeis automatically pre-selected (if you only have one node). - The
VM IDis also automatically assigned (e.g.100), but you can change it if needed. - Give the VM a name, e.g.
ubuntu-test.
💡 Note: Note that the name must be entered in Unix format without spaces.
Resource Pool: You can ignore this point and leave it empty.
General Configuration:
- Node: proxmox-node
- VM ID: 100
- Name: ubuntu-test
- Resource Pool: leave empty
Click Next to continue.
Step 2: OS
In the second tab OS, you set the operating system.
- Use CD/DVD disc image file (ISO): This option is pre-selected by default.
- Storage: Select where the ISO file is located.
localis pre-selected by default. - ISO Image: Select the desired ISO file from the dropdown menu, e.g.
ubuntu.iso. - Guest OS Type: Select
Linux. - Version: Select
6.x - 2.6 Kernelfrom the dropdown menu.
OS Configuration:
- CD/DVD disc image: active (ISO)
- Storage: local
- ISO Image: ubuntu.iso
- Guest OS Type: Linux
- Version: 6.x - 2.6 Kernel
Click Next to continue.
Step 3: System
In the third tab System, you configure the basic system parameters.
- Graphic card: Leave this on
Default. - Machine: Select
q35. - Firmware: Select
OVMF (UEFI). - Add EFI Disk: This option is enabled by default.
- EFI Storage: Select
local-lvmfrom the dropdown menu. - SCSI Controller: Leave this option on
VirtIO SCSI single.
System Configuration:
- Graphic card: Default
- Machine: q35
- Firmware: OVMF (UEFI)
- Add EFI Disk: enabled
- EFI Storage: local-lvm
- SCSI Controller: VirtIO SCSI single
Click Next to configure the hard drive.
Step 4: Disks
In the Disks tab, you set the storage configuration for the VM.
- Bus/Device: Leave this on
SCSI. - Storage: Select
local-lvmfrom the dropdown menu. - Disk size (GiB): Enter the desired size (e.g.
50 GB).
💡 Note: Note that you should not use the entire capacity of
local-lvmto keep buffer for snapshots.
- Cache: Leave this option on
Default.
Disks Configuration:
- Bus/Device: SCSI
- Storage: local-lvm
- Disk size: 50 GB
- Cache: Default
Click Next to configure the CPU settings.
Step 5: CPU
In the CPU tab, you configure the processor settings.
Sockets and Cores:
- Select
1 Socketand2 Cores. This is ideal for tests and smaller applications. - Check the number of sockets and cores of your physical processor.
Type:
- Select
Hostto run the VM with the properties of the host.
Click Next to set the memory.
Step 6: Memory
In the Memory tab, you set the memory for the VM.
Memory (MiB):
- Enter the amount of memory the VM should use (e.g.
4096 MiBfor 4 GB). - If your physical server has 16 GB RAM, VMs should be assigned a maximum of 6-8 GB.
Memory Configuration:
- Memory: 4096 MiB
- Ballooning: disabled
Click Next to configure the network settings.
Step 7: Network
In the Network tab, you set the connectivity of the VM.
- Bridge: The option
vmbr0is pre-selected by default. - Firewall: Keep the checkbox enabled.
- Model: Select
VirtIO (paravirtualized). - MAC Address: Leave this option on
Auto.
Network Configuration:
- Bridge: vmbr0
- Firewall: enabled
- Model: VirtIO
- MAC Address: Auto
Click Next to view the summary.
Step 8: Summary
In the last step, you will see a complete overview of the settings. Review all parameters carefully and make sure they meet your requirements. If everything is correct, click Finish to create the VM.
Start VM:
💡 Tip: Once the VM is created, you will find it in the list under your node.
- Select the VM and click
Startto start it. - Open the console to begin the operating system installation.
Install Operating System
Begin the operating system installation in the VM. The process depends on the selected operating system, e.g. Ubuntu Server:
- Select
Install Ubuntu Serveron the boot screen. - Follow the installation steps:
- Select language and keyboard.
- Configure network settings (automatically via DHCP or manually).
- Partition hard drive (default settings recommended).
- Set user and password.
💡 Note: Once the installation is complete, the VM will automatically restart.
⚠️ VM Checklist:
- ISO file added
- VM created and configured
- Operating system installed
🔧 Practical Example:
After the guest system is installed, it is recommended to immediately activate the QEMU Guest Agent in the guest:
# Execute within the virtual machine (Debian/Ubuntu):
sudo apt update && sudo apt install -y qemu-guest-agent
sudo systemctl enable --now qemu-guest-agent
Best Practices for Proxmox VE
Here are some important best practices to help you use your Proxmox system efficiently and securely:
Plan your resources carefully:
Assign only as many CPU cores and memory to your virtual machines as they actually need. Excessive allocation can degrade the performance of your host.
🔧 Practical Example:
With 16 GB RAM on your host server, you should not assign more than 4 GB to a test VM to keep enough resources for the host and other VMs.
Use static IP addresses for network configuration:
Your Proxmox host and important VMs should use static IPs so they are always reachable on the network. This avoids problems with dynamic DHCP assignments.
Update your system regularly:
Make sure you always keep Proxmox VE up to date to close security vulnerabilities. Update via the web interface under Updates and restart the system after kernel updates.
Use the Proxmox dashboard for monitoring:
Regularly check the usage of CPU, memory, and storage in the dashboard.
Only install what you need:
Keep your system lean and only install the necessary packages or software.
Do not open unnecessary ports:
Make sure your Proxmox server is running in a trusted network.
Regularly delete test VMs:
Remove VMs that are no longer needed and their hard drives to free up storage space.
Plan capacity for storage and CPU:
If you set up multiple VMs, you should make sure that the host always has some reserve capacity.
⚠️ Proxmox Best Practices at a Glance:
- Resource Management: Plan RAM and CPU allocation carefully
- Static IP Addresses: Prevents network problems
- Regular Updates: Keeps your system secure and stable
- Monitoring: Monitor usage of host and VMs
- Minimalism: Do not install excessive ports or unnecessary software
Command Reference (Cheatsheet)
| Command | Description |
|---|---|
qm list |
Displays all configured virtual machines and their runtime status |
qm start <vmid> |
Starts the virtual machine with the specified ID |
qm shutdown <vmid> |
Sends a clean ACPI shutdown signal to the virtual machine |
qm stop <vmid> |
Forces immediate termination of the VM (hard power-off) |
qm status <vmid> |
Outputs the current status (running, stopped) of the VM |
qm config <vmid> |
Displays the complete configuration file of the virtual machine |
pvesm status |
Lists all configured storage pools including usage and status |
pvesh get /cluster/resources |
Retrieves cluster or node resource statistics via the PVE API |
pveversion -v |
Displays all installed Proxmox and kernel package versions in detail |
systemctl status pveproxy |
Checks the status of the Proxmox web GUI service (port 8006) |
Further Resources
| Resource | Description |
|---|---|
| Proxmox VE Documentation | Official documentation and reference for all components |
| Proxmox VE Administration Guide | Comprehensive administrator manual for KVM and clustering |
| Proxmox Forum | Official community forum for exchange and help |
| Proxmox VE ISO Download | Download area for official installation images |
| Debian Downloads | Official Debian images and package sources |
| Proxmox VE YouTube Channel | Official video tutorials and demonstrations |
| Linux Basics: Beginner Tutorial | Introduction to Linux shell and system administration |
| Proxmox GitHub Repository | Open-source codebase and development repositories |
| Proxmox VE Reddit Community | Active discussion and homelab community on Reddit |
💡 Tip: Keep the Proxmox documentation and forum as bookmarks to quickly find help and answers when you have technical questions or encounter problems.
Conclusion
Proxmox VE is a powerful open-source platform that gives you an easy entry into the world of virtualization. In this article, we guided you step by step through the installation and showed you how to create and configure your first virtual machine. From preparing your hardware to adding an ISO file to correct resource allocation: With these basics, you are well equipped to use Proxmox efficiently.
The clear focus of this guide is to support beginners with their first steps without overwhelming them with more complex topics such as firewalls, monitoring, or backups. Through the simple web interface, you can intuitively manage your system and start virtualizing immediately. With Proxmox, numerous possibilities open up for you, whether for homelabs, small server setups, or first steps in professional IT environments. Stay curious, experiment with more features, and use the provided resources to deepen your knowledge.
👉 Course Overview: All Proxmox VE Articles & Guides